
By Paul Klonowski
Solo Sideslips
To the casual observer, a Sideslip is simply magic. A couple of years ago, Lynn Dominguez conducted a FreeStyle demonstration in the pool at Canoecopia (a huge winter paddlesports trade show in Madison, Wisconsin), showing the basics of performing several manoeuvres, for which there was some applause every time. When she did a Sideslip, many oohs and aahs rumbled through the crowd. How can you make a canoe go forward and sideways simultaneously?
It’s not magic… it’s physics! Sideslipping can be a useful skill in daily paddling when, for instance, one wishes to manoeuvre around obstructions in a river, such as rocks, without turning broadside to the current. It’s also handy for approaching a dock or making slight adjustments to how far the canoe is from the dock as it slides into the landing position. And for the more sporting paddlers, it’s fun to play ‘chicken’, where two canoes move directly toward each other until one veers away. Then the other canoe has to move such that the two canoes will not collide – a real crowd-pleaser!
First of all, the boat has to have momentum. Note that Sideslips work in both forward and reverse directions, but this article will only address Forward, Onside Sideslips, on flat, not moving water, as a primer. Also, note the canoe needs to be going STRAIGHT! As in, not turning:
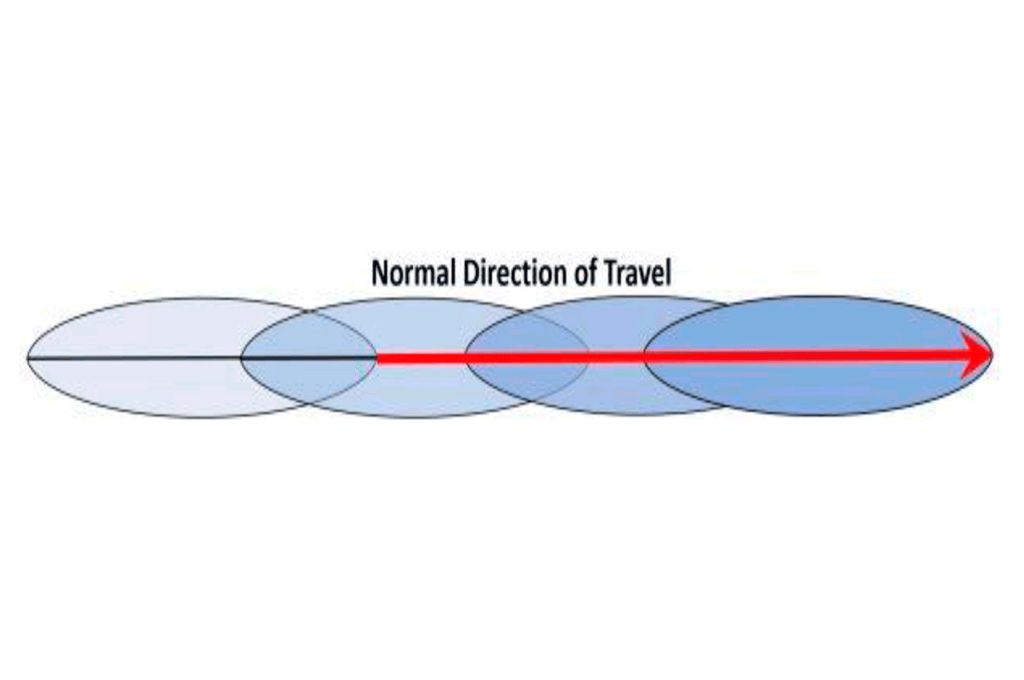
The turn will continue if the canoe is turning or yawing, even just a little when the Sideslip is initiated. A properly executed Sideslip does NOT turn the canoe… it moves the canoe diagonally, as shown here:
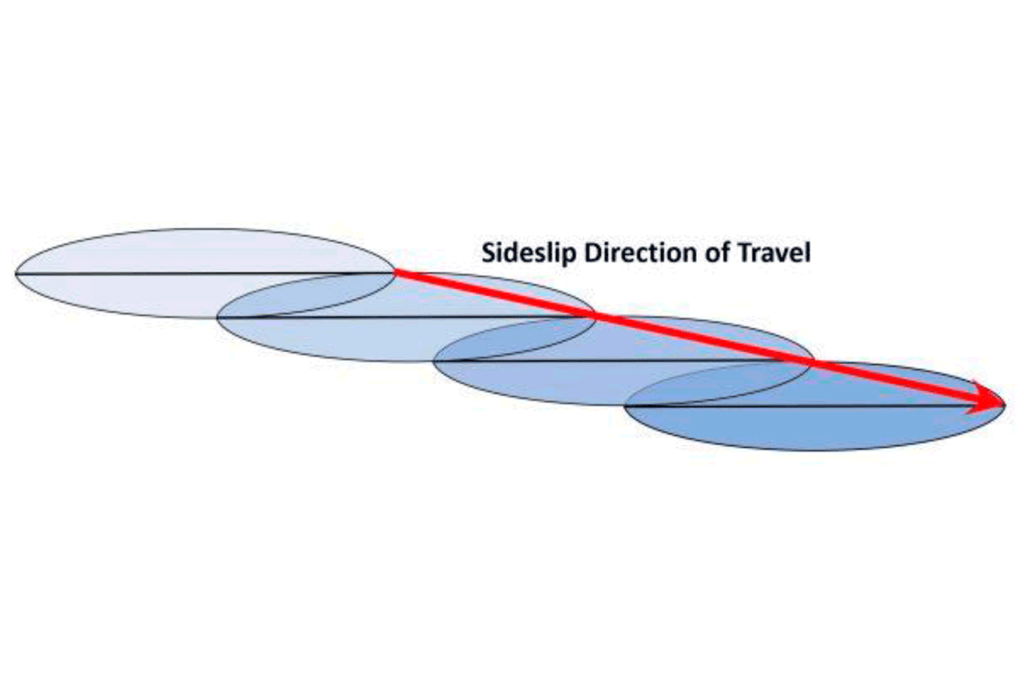
The diagonal travel is created by placing the paddle in the right location; at the correct angle, the canoe already has forward momentum, but the correct paddle placement adds sideways momentum while the canoe is still moving forward. Let’s take a close look at how this is done.
One crucial building block for Sideslips is understanding how to place the paddle in the water in a ‘neutral’ position. This is done by slicing the paddle into the water parallel to the keel line. Also, note the paddler’s torso is rotated a bit, so the paddler is facing somewhat toward the paddle:
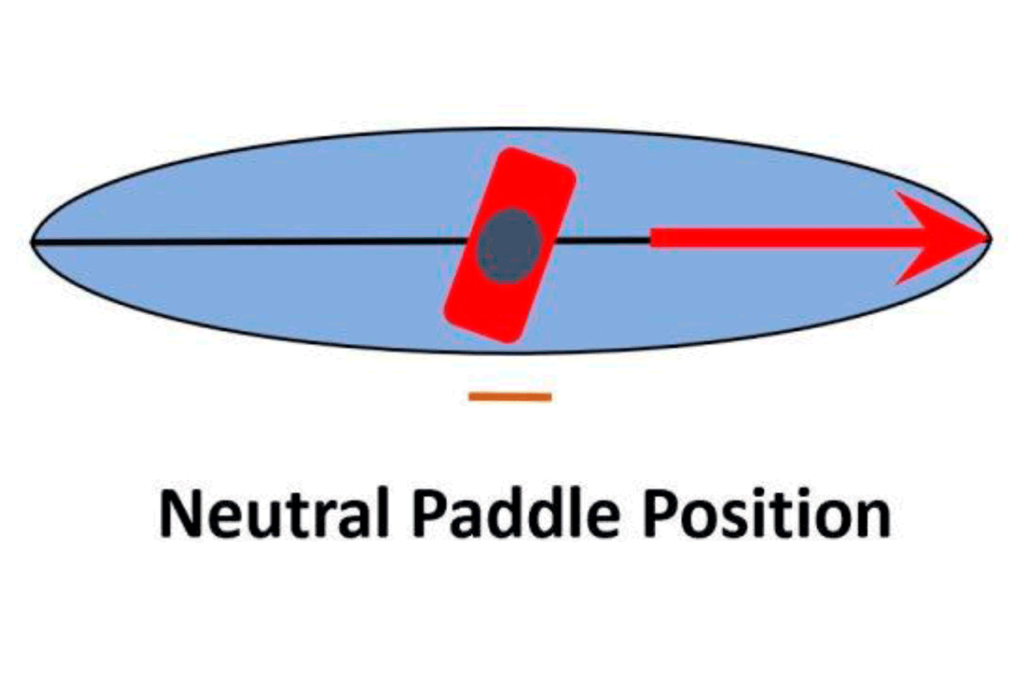
If the canoe is moving forward, and the paddle is truly Neutral, the paddle slices through the water cleanly, not being pulled toward or away from the canoe.
This neutral orientation can be accomplished from the end of a J stroke, once the canoe is moving straight forward, by slicing the paddle through the water, completely neutrally, to the placement location. This takes a bit of practice but is the key to Sideslips.
Suppose the slice to the neutral orientation causes the canoe to turn or lose momentum. In that case, the paddle may be taken out of the water at the end of the J stroke, moved into position, and then re-inserted into the water in the neutral position.
From this neutral position, it’s time to learn where the paddle should be placed and how the blade is turned to get the Sideslip moving. For a Drawing Sideslip, in which the canoe is drawn toward the paddle side, the paddle must be placed near or a bit behind the paddler and then turned outward just a little bit, so the leading edge of the blade is slightly further away from the hull than the trailing edge:
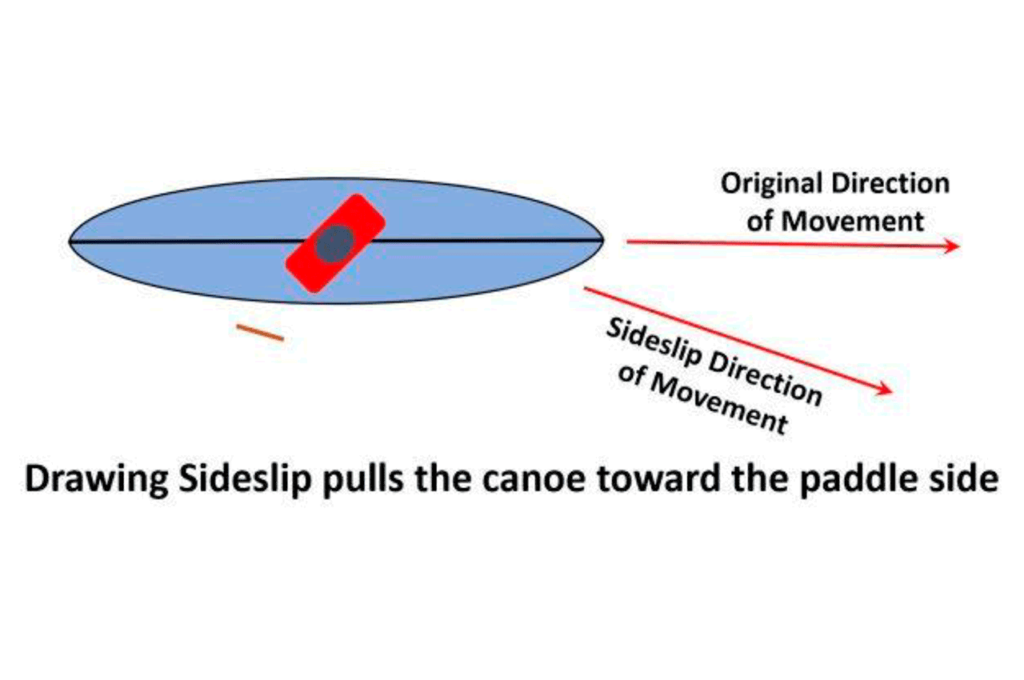
Note the angle at which the paddle blade is situated: the blade’s leading (forward) edge points toward the intended direction of the Sideslip!
Remember to keep the paddle shaft as nearly vertical as possible and the blade angle reasonably small, not more than 15˚. If the angle is too great, it will begin to act as a brake and disrupt the canoe’s momentum.
The first few times most people try this, the canoe is likely to turn, one way or the other. The key is paddle placement, as described above. If the canoe turns toward the paddle side, it’s too far forward and needs to be placed further back. If the canoe turns away from the paddle side, it’s too far back and needs to be placed further forward. A combination of location and blade angle comes into play for this, and it will vary slightly from paddler to paddler and boat to boat. Only experimentation will teach anyone the right combination of location and angle for the paddler and the canoe.
Imagine an arrow pointing straight out of the paddle blade face. It should be pointing somewhere between the canoeist’s tailbone and belly button. Torso rotation is crucial for this activity, to avoid shoulder injuries! Note how much the paddler is turned in the illustration above! If the torso isn’t this flexible, the offside knee should be moved toward the keel line, maybe even to the on side, to affect this torso position. However, this may cause the canoe to be heeled to the onside, which is not desirable; it causes the low side of the hull to create a snowplough effect, in essence trying to push the water in front of it:

By heeling the opposite way, to the offside, the hull creates more of a ‘planing’ effect:
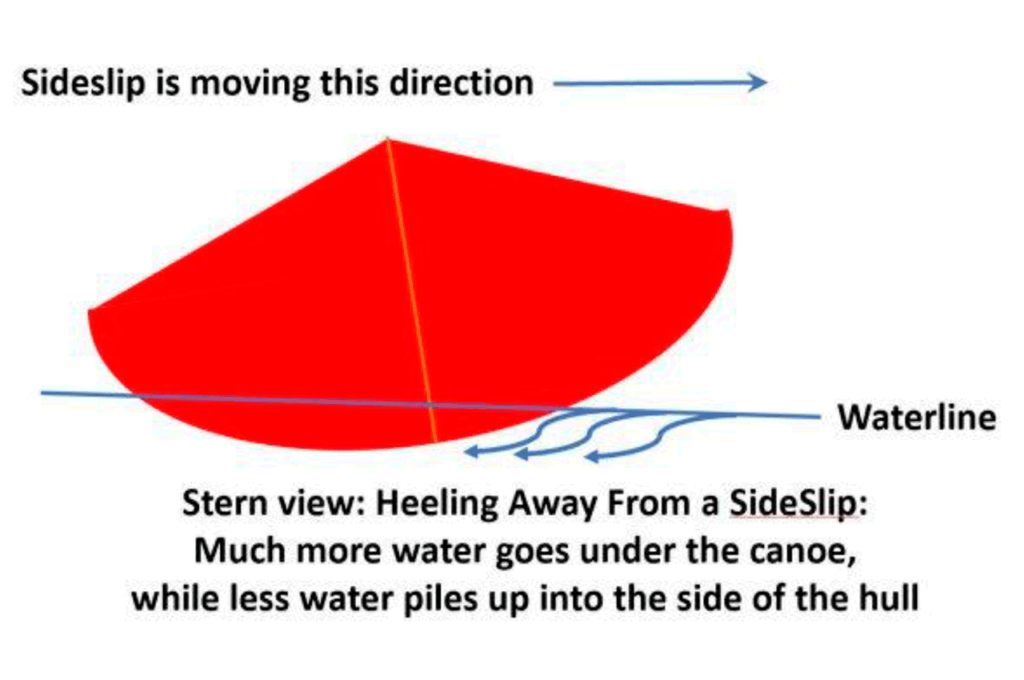
These two illustrations are views from behind the canoe, as it’s moving away from the viewer. In the first illustration, the canoe is sideslipping to the right while heeled to the right, and the steeper attitude of the canoe’s hull creates the ‘snowplough’ effect, pushing water in front of the hull. In the second illustration, the canoe is also sideslipping to the right, but the shallower angle of the hull creates more of a ‘planing’ effect, moving the canoe over the water more efficiently.
A prying sideslip causes the canoe to move away from the paddle side. The differences between a Drawing and a Prying Sideslip are the paddle position and angle and the direction of the heel. The paddle is placed just a bit forward of the paddler’s hip, closer to the paddler’s knee, and the leading edge is angled in, again not more than 15 degrees:
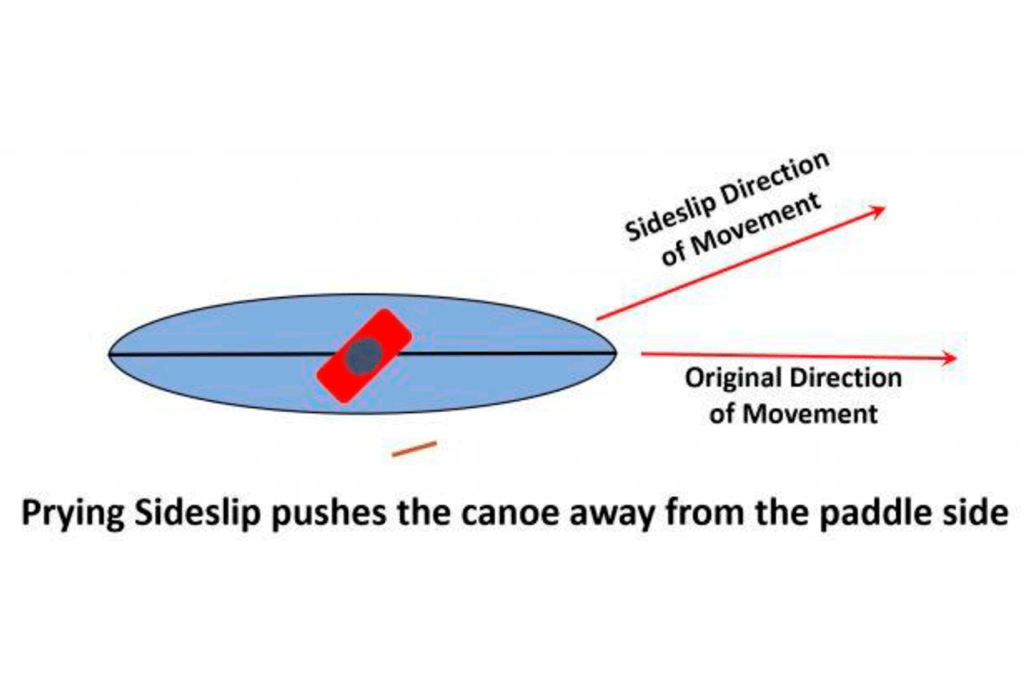
Once again, note the angle at which the paddle blade is situated: the blade’s leading (forward) edge points toward the intended direction of the Sideslip!
Remember that ‘arrow’ pointing straight out of the paddle blade face? It must still point between the paddler’s tailbone and belly button. And it still takes some experimentation to find the correct placement position to make it work without turning – practice, practice, practice.
Here’s a video of Marc Ornstein showing some very practical applications of sideslips: www.youtube.com/watch?v=CTh_B8NkuhA
Of course, these same Sideslips can be applied as cross manoeuvres, reverse manoeuvres, and cross reverse manoeuvres, but get the onside forward Sideslips working before you even think of the other applications. Remember that Sideslips only work if the canoe moves; if you’re on a river, the canoe must move faster than the water. This skill is best learned on flat water, first!
Tandem sideslips take a bit of coordination between the tandem paddlers but are easier, though that’s another article!
Want to know more about freestyle canoeing? Go to: https://freestylecanoeing.com


Wonderful essay, tho I would love to see ( perhaps as a follow up) some discussion of:
…the effects of Hull shape and type ( with some reference to tandem canoes paddled solo, as will be the case with many of the readers of this fine article) . The old Bluewater tripper with it’s asymmetric Hull and small rocker is an extreme example.
..,of the effect and response to de-optimized trim ( again, including, as will often be the case, with tripping canoes as the load changes mid trip).